Originally created May 2025 · Rebuilt and modernized with the help of Claude Opus 4.8 (vibe coding)
A keyboard shortcut, a grid of buttons at your mouse pointer, and one click to launch apps, open folders, run commands, or jump straight into a Windows settings page. No extra hardware required.
Why I Built This
I have been a Stream Deck user for many years, and I think Elgato built something genuinely useful with it. The feature I love most is the Virtual Stream Deck: press a shortcut and a virtual deck pops up on your desktop, ready to control lights, change volumes, and a lot more. The part I use most often is the quick launching of applications, folders, and hyperlinks.
But the Virtual Stream Deck has one catch: it needs a physical Stream Deck plugged into a USB port to work. That is fine on a normal desktop — but it becomes a problem the moment I want to use it inside my Hyper-V clients. The physical device is not passed through to the VM, so the Virtual Stream Deck simply does not work there. Even Elgato support confirmed it is not designed for that scenario.
So in May 2025 I sat down and built my own little “mini Virtual Stream Deck” — the Virtual Button Deck. The first versions already worked quite well and were perfectly sufficient for my needs.
Then came vibe coding with ChatGPT Codex, Copilot, and Claude. With the help of Claude Opus, I gave Virtual Button Deck a complete overhaul and added a long list of new features — and I only had to step in and tweak the code myself a handful of times.
The old version had no settings dialog, was not translucent (where supported), had to be configured by editing JSON files directly, and had no pin option, no drag & drop for buttons, no button configuration dialog, and so on. The new version fixes all of that.
What Is Virtual Button Deck?
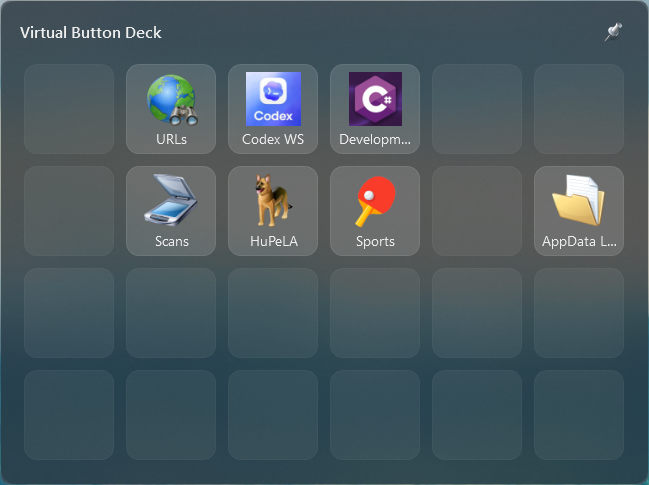
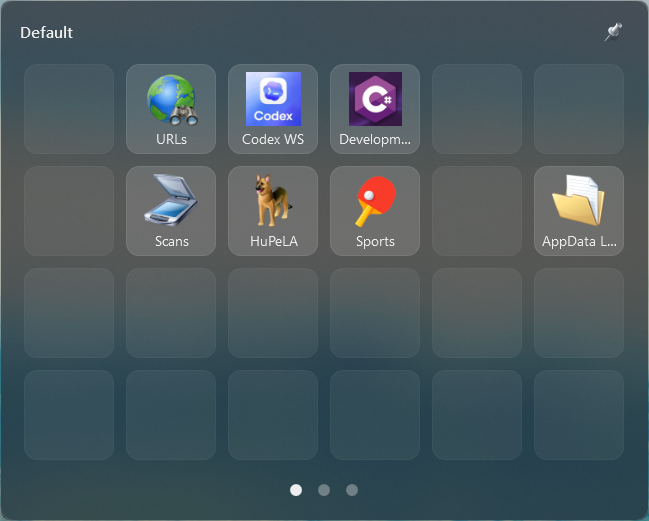
Virtual Button Deck is a small, borderless Windows app that sits quietly in your system tray. Press a global hotkey (Ctrl + Q by default) and a glass-style grid of buttons appears right where your mouse pointer is. Click a button to run its action, then the deck gets out of your way.
Each button can be freely configured with an icon or image and assigned to one of several action types:
- Launch an application
- Open a folder
- Run a command line
- Open a URL / URI / protocol
- Open a group (sub-deck)
How Does It Work?
The idea is deliberately simple and fast:
- Press the hotkey. A configurable global shortcut (Ctrl + Q out of the box) opens the deck instantly.
- The deck appears at your cursor. By default it is centered on the mouse pointer, so you never have to travel across the screen. You can also pin it to a fixed position if you prefer.
- Click a button. The assigned action runs immediately — an app launches, a folder opens, a command executes, or a web/settings page comes up.
- The deck disappears. It hides again automatically once you are done, keeping your desktop clean.
That whole loop takes a fraction of a second, which is exactly what makes it feel so handy in daily use.
Configuring a Button
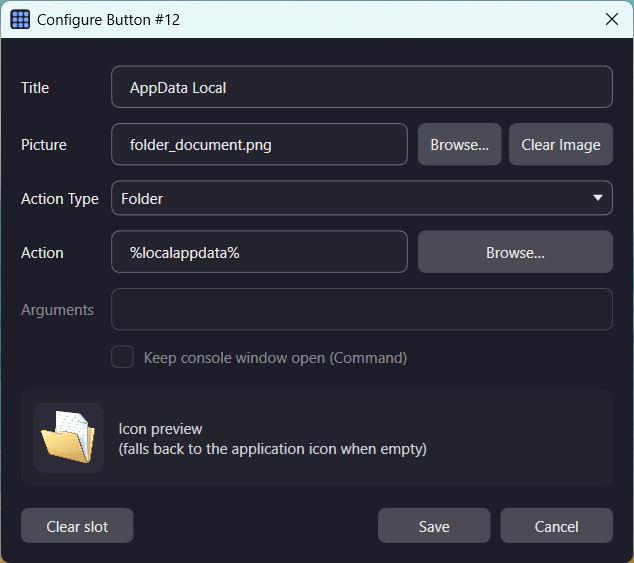
In the old version, configuration meant editing JSON by hand. Now every button is configured through a clean dialog: just right-click any tile on the deck. Empty tiles can be filled, and existing tiles can be edited or cleared.
For each button you can set:
- A title shown under the icon.
- A picture — your own image/icon file, or it falls back to the target application’s icon automatically.
- An action type: Application, Command, Folder, URL / URI / Protocol, or Group.
- The action target itself, plus optional arguments for applications.
Images are stored in a shared Images folder next to the configuration, so the same picture can be reused across many buttons.
URLs, URIs, and Protocols
The URL / URI / Protocol action type is more powerful than it first looks. Type a plain web address like example.com and it opens in your default browser. But you can also use protocol handlers, which makes deep Windows shortcuts trivial:
ms-settings:privacy-microphone— jump straight to a specific Windows Settings page.shell:Startup— open a special shell folder.mailto:name@example.com— start a new email.
If a scheme is present, it is opened as-is; if you typed a bare web address, https:// is added for you.
Groups: Decks Within the Deck
A Group button opens a separate sub-layout (fixed at 6 × 4) that you only reach by clicking that button — it does not appear in the normal paging. The top-left slot is always a predefined “← Back” button, and the rest is freely configurable just like any other layout. It is a clean way to organize related actions without cluttering your main deck.
Making It Yours: The Settings Dialog
Everything is configurable from a single settings dialog, reachable from the tray icon. No more hunting through JSON files.
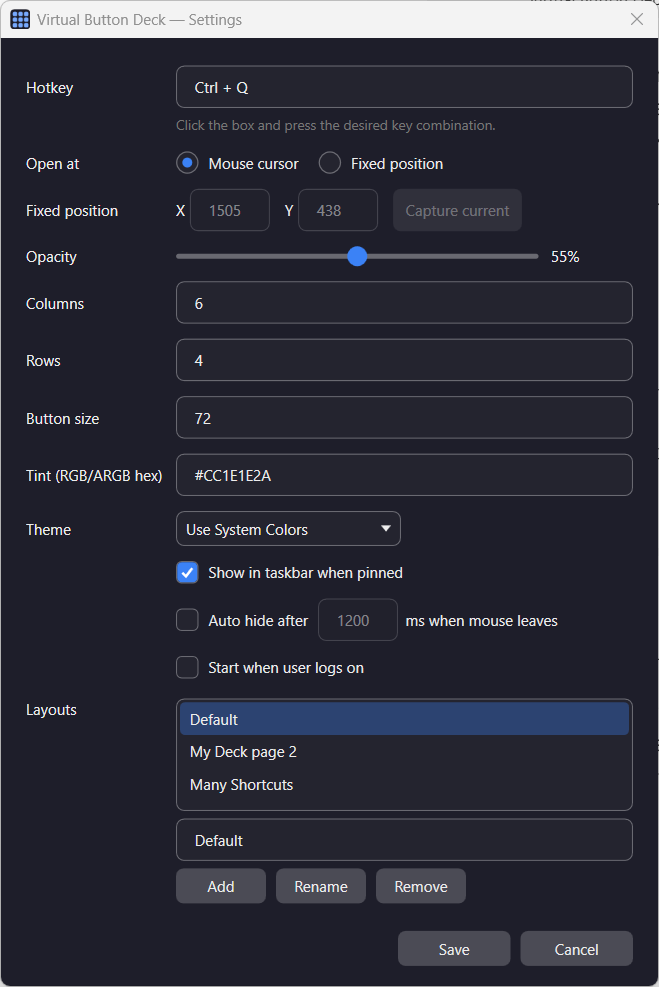
Some of the things you can adjust:
- Hotkey — click the field and press your desired key combination to capture it.
- Open position — at the mouse cursor, or at a fixed screen position you can capture.
- Opacity — a slider for how transparent the glass surface is.
- Grid size — columns, rows, and button size.
- Theme — Light, Dark, or “Use System Colors” to follow Windows automatically.
- Auto hide — make the deck disappear a chosen number of milliseconds after the mouse leaves it.
- Start when user logs on — adds (or removes) a shortcut in your Startup folder.
- Layouts — create, rename, and remove multiple button pages.
The Little Things That Make It Pleasant
Glass, Themes, and Rounded Corners
On capable systems the deck uses a real acrylic/glass blur and rounded corners, matching the modern Windows 11 look. On systems without hardware-accelerated rendering — like a VM with a basic display driver — it gracefully falls back to a clean, solid, square-cornered window instead of showing visual artifacts. It just works, wherever you run it.
The Pin
In the top-right corner there is a small pin. Normally the deck hides as soon as it loses focus. Click the pin and it turns green: the deck stays open even when you click elsewhere. Shift-click it and it turns red: now it stays open and always on top. Escape always closes it, regardless of the pin state — and there is an option to show the pinned deck in the taskbar so you can bring it back to the front easily.
Drag & Drop — Rearrange Buttons in Seconds
One of my favorite everyday touches: you can rearrange your buttons by simply dragging them. Grab any configured tile with the mouse and drop it onto an empty slot — the button moves there instantly, and the change is saved right away. It works the same way on normal layout pages and inside groups.
Occupied slots are protected, so a drop only ever lands on a free space — you can never accidentally overwrite a button you already set up. There is no “edit mode” to toggle and nothing to confirm: pick up a tile, drop it where you want it, done. After living with hand-edited JSON in the early versions, being able to just shuffle tiles around with the mouse feels like a small luxury.
Tip: Left-click runs a button, right-click configures it, and click-and-drag moves it. Three gestures, the whole deck under control.
Multiple Layouts — Several Decks in One
This is the feature that turned Virtual Button Deck from a single board into something I organize my whole day around. Instead of cramming everything onto one grid, you can create several independent layouts — for example one for everyday apps, one for development tools, and one for system and admin shortcuts — and switch between them in an instant.
When more than one layout exists, a row of dots appears at the bottom of the deck, one per layout, with the active one highlighted. Click a dot to jump straight to that layout, or simply use the left/right arrow keys to page through them. With a single layout, the dots stay hidden so the deck stays clean — so the interface scales with how much you actually use it.
Group sub-decks deliberately stay out of this rotation: they are only reachable through their own group button, which keeps your main left/right paging focused on the layouts you flip between most.
Built for the VM Use Case
The whole reason this project exists is portability. Virtual Button Deck is a self-contained Windows app with no dependency on any external hardware. The configuration lives in simple files right next to the executable (or in your local app-data folder if that location is read-only), so you can drop the whole thing into a Hyper-V client and have your familiar deck up and running in seconds — exactly where the original Virtual Stream Deck could not follow me.
Under the Hood
Virtual Button Deck is a WPF application built on .NET Framework 4.8.1 — and that choice is very deliberate. The 4.8.1 runtime ships as part of Windows, so there is nothing extra to install: no runtime download, no installer, no prerequisites. You can drop the executable into a fresh Hyper-V client and it simply runs. For a tool whose entire reason to exist is “be there wherever I am,” that matters a lot.
…well, almost everything is plain managed .NET. The glass/acrylic blur, the global hotkey, the rounded corners, reading the cursor position, following the Windows light/dark setting, the logon shortcut — a surprising amount of that leans on direct Win32 API calls and native functions underneath the managed surface. So in honesty it ended up being more of a hybrid project: a tidy WPF shell with a fair bit of P/Invoke plumbing behind the scenes. That mix is exactly what lets it feel native on modern Windows while still falling back gracefully where those APIs are not available.
Installing It
There is no setup wizard — and there does not need to be. Virtual Button Deck is a single executable. My recommended way to install it:
- Download the executable.
- Create a folder at
%LocalAppData%\Programs\VirtualButtonDeckand copy the executable into it. - Start it from there — that’s it. (Optionally enable “Start when user logs on” in the settings.)
Running it from its own folder has a nice benefit: the executable, the configuration files, and the Images folder all live together in one place. That keeps everything self-contained and easy to find.
It also makes the deck wonderfully portable. To move it to another PC, just copy the whole folder over and run it there — your buttons, layouts, images and settings come along for the ride. The only thing you may need to adjust afterwards are absolute paths inside individual buttons (for example a program or folder target that lives at a different location on the new machine).
Where It Stands Today
What started as a quick personal tool in May 2025 has grown — with a lot of help from Claude Opus — into something I genuinely reach for every day: a configurable settings dialog, a per-button editor, embedded-style image handling, themes that follow Windows, pinning, auto-hide, group sub-decks, drag & drop, protocol launching, and a “start at logon” option.
It is still a “mini” deck by design, and that is the point. It does the handful of things I want — fast, anywhere, no hardware attached.
If you have ever wished the Virtual Stream Deck would just follow you into a VM, this is my answer to that wish.
Virtual Button Deck is a personal project and is not affiliated with or endorsed by Elgato. “Stream Deck” is a trademark of its respective owner.
Updates
The article above describes Virtual Button Deck as of version 1.3.0.0. New versions and their changes are logged here.
Version 1.4.0.0 — June 2026
- Keyboard shortcuts for buttons. Any button can be assigned a single letter (a–z) in the button configuration dialog. While the deck has focus, pressing that letter triggers the button instantly — for example
Ctrl + Qthend. Shortcuts work in every normal layout (group sub-decks are excluded) and travel with a button when you drag & drop it. - On-button shortcut badge. Buttons that have a shortcut show the letter as a small badge in the top-left corner.
- New setting: “Show keyboard shortcuts on buttons” toggles the badges on or off (the shortcuts keep working either way).
Download v1.4.0.0 from here
Leave a Reply
You must be logged in to post a comment.